
Thursday, January 3, 2013
My tree is almost bare........

Tuesday, January 1, 2013
Siew Yoke - Chinese Roast Pork
1/1/2013 Made Siew Yoke- Chinese Roast Pork for the first dinner of 2013!! A delicious, addictive basic Chinese dish but not easily available food here in the USA. Generally, it requires going to a Chinese restaurant or a specialized Chinese Supermarket to purchase Siew Yoke.
My brother in law makes a mean Siew Yoke and shared his secrets with me. However, I have been unable to obtain the right cut of pork i.e. belly meat with rind/ skin. A visit to the new Seafood City for new year meals cooking supply yielded the required cut of pork.
It is the simplest recipe. Mix equal part kosher salt with equal part of Chinese Five Spice powder - 1 teaspoon of each. Use enough of the mixture to generously season both side of the meat. Wrap the meat and let it sit in the fridge overnight. Next day, take it out and let it come to room temperature.
Preheat broiler to 420F degree. Place seasoned pork, meat side up on broiler pan. Broil until meat is brown. It could take 20-30 minutes, depending on the size of the piece of pork. Turn the meat over to skin side and broil at 390F. Start with 10 minutes, after that rotate the pan every 5 minutes until skin is brown and crackly.

My brother in law makes a mean Siew Yoke and shared his secrets with me. However, I have been unable to obtain the right cut of pork i.e. belly meat with rind/ skin. A visit to the new Seafood City for new year meals cooking supply yielded the required cut of pork.
It is the simplest recipe. Mix equal part kosher salt with equal part of Chinese Five Spice powder - 1 teaspoon of each. Use enough of the mixture to generously season both side of the meat. Wrap the meat and let it sit in the fridge overnight. Next day, take it out and let it come to room temperature.
Preheat broiler to 420F degree. Place seasoned pork, meat side up on broiler pan. Broil until meat is brown. It could take 20-30 minutes, depending on the size of the piece of pork. Turn the meat over to skin side and broil at 390F. Start with 10 minutes, after that rotate the pan every 5 minutes until skin is brown and crackly.

Succulent Basket
It is a miracle. It is January 1, 2013 and I am blogging!! Actually, I am blogging because I following through with my "resolution" to put me first this year. I signed up for a gym membership at the local YMCA with my daughter just before the new year so physically I will get back to being more active. Hoping to finally take some yoga and pilates classes. 2013 I am committed to devoting more time to my creative pursuits.
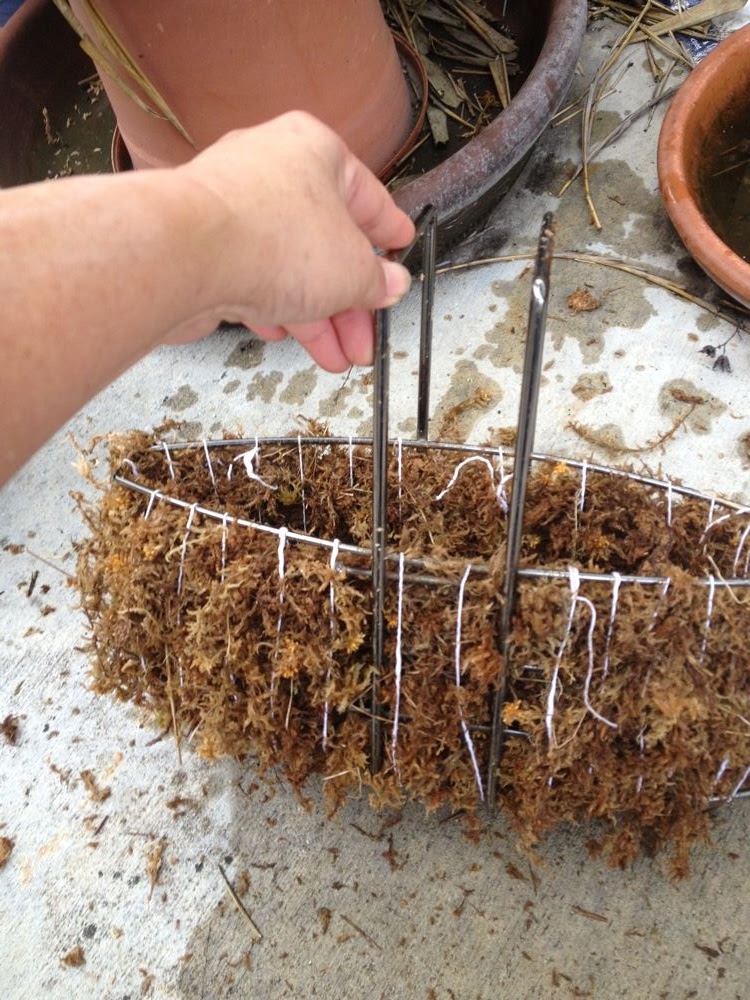
I started the year on the right note. I spent some time gardening- my first love. It was kind of chilly but the need to garden was overwhelming. I needed to create something not just potter around. I recycled an old metal toiletry metal basket/ container/ caddy for a lovely succulent garden. I lined the basket with damp sphaghum moss, tied the moss to the basket with some twine and filled the center with some fast draining soil and perlite mix.

I started the year on the right note. I spent some time gardening- my first love. It was kind of chilly but the need to garden was overwhelming. I needed to create something not just potter around. I recycled an old metal toiletry metal basket/ container/ caddy for a lovely succulent garden. I lined the basket with damp sphaghum moss, tied the moss to the basket with some twine and filled the center with some fast draining soil and perlite mix.
Thursday, November 29, 2012
Persimmon - Fruits of the Gods

My beloved Fuyu Persimmon tree continues to reward me with delicious fruits despite my neglect. I cannot say that I have always attended to it well but this year, life has truly overwhelm me. Caring for two houses and gardens, an hour and half apart plus the stress of a teenage son applying to college.......
Before the Fuyu started taking color, the only time I paid attention to the tree this year was to take pictures of the Persimmon flowers for Autumn Belle- a promise I made when I was harvesting last years crop. It was the ruckus of wild chirping and flapping of wings that emanating from the vicinity of the Fuyu Persimmon tree that woke me up from my stupor. Those birds were fighting each other to get at the fruits! I do not know what angered me more, the delicious ripe persimmon eaten by the birds or the beautiful green unripe persimmon needlessly pecked by the birds? Every gardener with a persimmon tree knows you have to share some fruits with the birds, the keyword here is SOME.

Tuesday, November 6, 2012
Year of the Dragon - Fruit!
For the last 3 years, my Pitaya /Dragon Fruit plant Hylocereus undatus had teased me with beautiful blossoms but never rewarding me with any fruit. It seems it was just waiting for Year of the Dragon to start fruiting! I was pleasantly surprised to see that the blossom did not just fall off but two dragon fruits had formed on the plant. One of them has develop a beautiful pinky red color and the other has just a blush of color. I am not sure if they are of the same plant. It am excited to taste the fruit finally!!


September - flower

This blossom will turn into the blush colored Pitaya

One of the blossom turned yellow and will not grow to be a Pitaya

The remaining blossom has developed into a pinky red Pitaya

Just a touch of blush on this Pitaya
Mason Jar Salads
If you are a fan of Pinterest, you would have seen the use of Mason Jars for everything from storage, planting, lighting to premixes. Recently, in an effort to eat more healthy, I made some Mason Jar Salads. Really easy! Just gather together mason jars, your favorite salad dressing, salad greens and tomatoes. You can also include beans, cucumber, olives and even fruits if you like. Essentially, whatever you normally use to make your favorite salad.
The main thing is to keep the salad green away from the salad dressing. The first layer in the jar is the salad dressing. I like adding the tomatoes, carrots or cucumbers next. For some jars, I added pears cut into cubes. The layer on top of the salad dressing should be firmer to `lift' the salad greens away from the dressing. Fill with salad greens. Top with nuts or fruits if you like. Mandarin orange segments, watermelon cubes, and berries are good choices. These Mason Jar salads last for about a week. I was addicted to these salads, sometimes I would have a jar for lunch and dinner!! A little shopping, a few minutes of assembly and you are set for the week. Delicious!!


The main thing is to keep the salad green away from the salad dressing. The first layer in the jar is the salad dressing. I like adding the tomatoes, carrots or cucumbers next. For some jars, I added pears cut into cubes. The layer on top of the salad dressing should be firmer to `lift' the salad greens away from the dressing. Fill with salad greens. Top with nuts or fruits if you like. Mandarin orange segments, watermelon cubes, and berries are good choices. These Mason Jar salads last for about a week. I was addicted to these salads, sometimes I would have a jar for lunch and dinner!! A little shopping, a few minutes of assembly and you are set for the week. Delicious!!

Layers- salad dressing, tomatoes, salad greens.

Grab and go Mason Jar salads for work

Shake the mason jar to distribute the salad dressing

Poppy seed dressing and the addition of chickpeas. Yum!

You can add grill chicken to make it a complete meal
Wednesday, September 12, 2012
Broccoli Cheddar Soup

It was quite good although we lighten it up a bit since we were having not just one bowl of soup! Instead of the 2 cups of half and half, I use 1 cup each of whole milk and 1 cup of half and half. I have even use just whole milk and have been happy with it. Just nothing less than whole milk.
Subscribe to:
Posts (Atom)